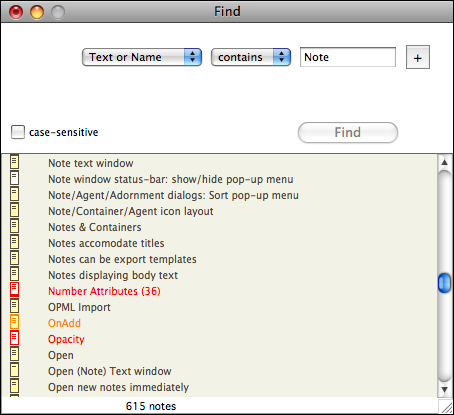
The Find view allows you to enter a second query clause by pressing the "+" button. It can be thought of as a temporary agent, existing outside the TBX; its only function is to find information - the user than takes action on it via the UI.
The case-sensitive option is saved as a document preference (but not an accessible Preference).
Target pop-up. The choices are the same as for an agent. System attributes values cannot be queried via this dialog. The pop-up has the following values:
- Text or Name
- Text.
- Name.
- [List of current TBX's existing user attributes].
Operator pop-up. The pop-up contains a list of operators as in the Create Agent dialog.
Value box. The value to be matched - a string literal or regular expression. To match non alphanumeric characters, e.g. a caret ^ or a parenthesis , you should escape them with a backslash: \^, \(; to find a sequence of 2 carets use \^\^, etc. (v5.0.1 fixes escaping of parentheses). The rules are based on those required for use of Regular Expressions, thus allowing 'grep' type searching. As soon as the third character of a value is entered Tinderbox starts searching and listing matches automatically - you won't need to bother clicking the Find button. To search for a value of only 1 or 2 characters, type the value and click the Find button to initiate the search.
+ button. Click this to add a second query with target/match/value controls.
- button. Removes the second query.
case-sensitive tick-box (default = ticked). If ticked comparisons are case sensitive. Case-sensitivity only applies to .contains("pattern")-type and AttributeName(pattern) arguments in the query. When you open the Find dialog, the initial value for case-sensitive is the value you set:
- when the Find dialogue was last opened.
- the document was last saved.
The criteria that may be set for a find are the same as those that may be created using an agent's query generator. It is not possible to hand-code a query, as in an agent's Create/Rename dialog; in such a scenario use an agent instead.
N.B., if a new agent is added whilst Find view is open, the agent's query defaults to the Find view's query.
Find button. Find text based on the above settings
[list of matching notes]. The bottom part of the pane shows notes matching the above criteria. Results are listed by note title ($Name) sorted in the default, lexical, sort order. A lexical sort means that instances of the same word in different letter case do not sort together: Ant, Bee, ant and not Ant, ant, Bee as a non-coder might assume. To have greater control over the sorting of results, use an agent instead of Find view.
The status bar below the list shows the count of current matches to the find criteria.
Marking of matches in $Text. Double-click the highlighted note to show its text window(using a shortcut or menu option doen't trigger the effect). The first match of the find term - if within $Text - is highlighted and scrolled into view. All other matches within $Text are given a dotted purple underline (the underline is new from 5.0.2). The menu Edit -> Find Next ([Cmd]+[G]) can be used to highlight each successive match.
A selected note can be displayed in Outline view. Select a note and press Cmd+Opt+O (or Views menu, New Outline View) to see the selected note in an outline rooted at its parent.
Notes in the list can be a target for links - this can save you scrolling or changing level a large outline or map view just to find the target for your link. The same process can be used to open new Map/Chart/Treemap or Explorer views and create basic links (via the selected list item's context menu).
Listed notes are rendered in their $NameFont value's typeface using $Color (rather than $NameColor). The list uses icons similar to those in the Outline view. In particular, the icon indicates how much text the note or agent contains and how recently it has been modified, and whether it is a prototype. Listed items are drawn their $Color, with the screen title using $DisplayExpression rather than $Name; to allow for longer titles, the dialog can be dragged wider if required.
If a note/agent is edited & closed or if it is renamed this is sensed and the list is updated - this is extremely useful when working through a list of corrections to a misspelt word.
When the dialog list has focus the mouse wheel and/or arrow keys may be used to scroll the list. The Preferences, Maps, Font size setting (Note label size) is also respected in this view - this is to allow for fonts that don't display well at the old hard-wired 12pt value used by this dialog.
The view's list is drawn with the TBX's $MapBackgroundColor. This can help when multiple TBXs are open, if each has a different $MapBackgroundColor then it is clear to which TBX a Find dialog belongs. List item colours are darkened according to the (Map) Preference to Darken colors in charts and outlines.
Unlike early versions the Find view window no longer floats.
When making an agent, if the Find view window is open and has a query, the new agent’s query is taken from the Find window. If the Find window is not open, the new agent's query is empty as before.
The Find window can match outline separators and map adornments; whilst it is possible to open the text window for a separator, attempting the same with an adornment opens its Rename dialog.
Links can be drawn out from a selected list item or to any item in the list.
From v5.8.0, listed matches honour $NameBold and $NameStrikethrough.