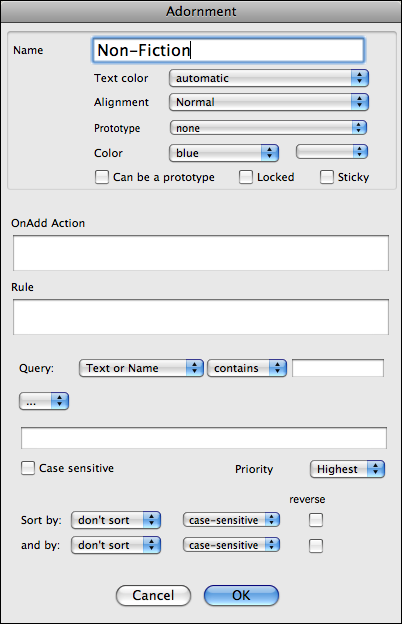
The Create Adornment dialog or Adornment window allows you to create adornments in Map views. Adornments sit 'behind' notes and allow you to add areas of color with optional labels to help with visual organisation. From v4.7.0, the query functions were added to allow creation of 'smart' adornments. The dialog has the following settings:
- Name. This is also the visual caption used on the adornment. To 'hide' the text caption set the text color to the same as the 'Color' setting (below). To use a text caption with no visible adornment color/boundary set the 'color' property (below) to 'transparent'.
- Text color. This is the color of the adornment's text caption. Default value is 'normal' which for a default body color is white text , or black if the adornment body is set to transparent. Note, the color qualifiers come before the color when used as a color name in actions, etc.; select 'blue' + 'lighter' but refer to it as 'lighter blue'. The value is stored in the Map attribute NameColor.
- Alignment. Settings offered are:
- Normal (default). Usually resolves as 'left'.
- Left.
- Center.
- Right.
- Prototype. The prototype note on which to base the initial attributes of new notes created on or dragged onto the adornment.
- Color. This is the color of the adornment area itself. Default value is 'normal'; this resolves to a grey fill and 2-pixel black border.
- Locked. If ticked, the adornment cannot be moved without clearing this setting. This can be useful when reorganising a map so the adornment is not accidentally shifted. Default - not ticked.
- Can be prototype. If ticked this note can be used as a prototype and will subsequently appear in the Prototype list (above) in Adornment Create and Rename dialogs. Default - not ticked. New to v4.7.0.
- Sticky. If ticked, moving the adornment also moves the notes behind which it sits. this saves you the trouble of moving an adornment and then having to re-position the notes on top of them. Default is un-ticked.
- OnAdd Action. Action code to perform on any new notes created in or moved to the adornment - i.e. it affects any note on top of the adornment (but not the adornment itself). This code is applied every time agents are updated. The code is stored in the OnAdd attribute.
- Rule. Action code to perform on the agent itself (and only the agent). This code is applied every time agents are updated. The code is stored in the Rule attribute.
- Query quick selectors. These allow one or two (using the following pop-up) match criteria to be set. The first pop-up allows the selection of a simple criterion of Name or Text, Name, Text, or any currently user-defined attribute. The second pop-up offers a list of comparison operators. The values set here are added to the Query code box (below).
- '.../and/or' popups. Selecting an 'and' or 'or' value here causes a second quick selector set (above) to be shown with an and or join. The values set here are added to the Query code box (below).
- Query code. Any code defined via the quick selectors is added here. It may be edited or replaced entirely with custom code. It is also possible to enter code here directly without using the above controls. This query is applied every time agents are updated. Any notes matching the query criteria will have aliases added inside the agent's container. The code is stored in the ActionQuery attribute.
- Case sensitive. If ticked (the default) any comparisons of string values are case sensitive. This only applies to AttbributeName(pattern) arguments in the query.
- Priority. Sets the AgentPriority attribute controlling how often the agent is run.
- Sort by / reverse. Optionally sets a sort order on any attribute value, with the sub-option of reversing that order. Values are persisted in the agent's Sort and SortBackward attributes.
- 'and by' / reverse. Optionally sets a secondary sort order, with the sub-option of reversing that order. Values are persisted in the agent's SortAlso and SortBackwardAlso attributes.
Atypically, this dialog cannot be called from any of the main menus, but only from a Map view's pop-up menu.
The OK button will be greyed out if a Rule or Action cannot be parsed. The unparseable code will remain highlighted to facilitate corrections. |
 |


