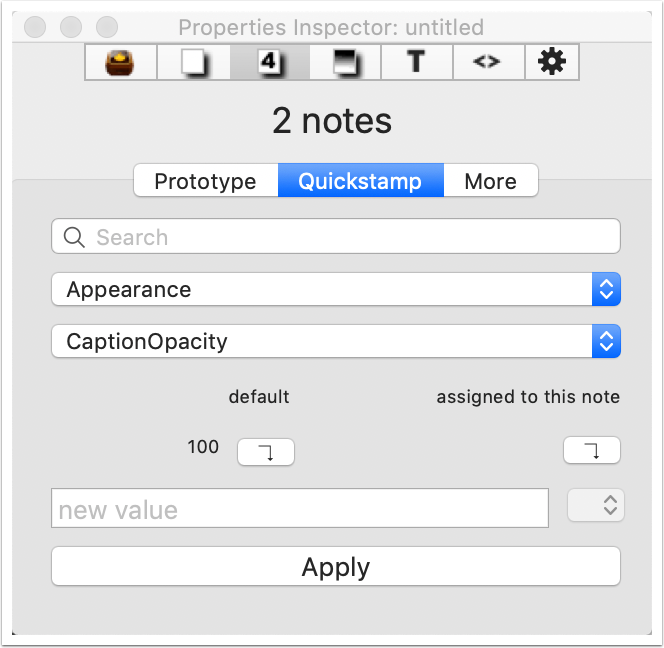
This tutorial shows how the Quickstamp feature works in v6, covering issues to do with inheritance as well. For the tutorial is is assumed you are trying to correct $CaptionOpacity in the Appearance group of System Attributes. The Quickstamp can alter any attribute System or User, as long as it is not read-only as some system Attributes are.
Note that User attributes - those you yourself add to a TBX document are listed as a the attribute group 'User', listed last in the group list.
Bear in mind that Quickstamp applies to the one attribute currently selected in the tab's controls but the change is applied to every note (agent, etc.) in the current main view selection.
This document was last revised using Tinderbox v8.6.2 on macOS 10.14.6.
Author: Mark Anderson (a Tinderbox user since 2004).
1. Finding the right part of the Inspector

The quickest way is to use the shortcut Cmd+2 (as in v5) which opens the correct location.
How to get there the long way? Open the Window menu, Inspector (shortcut Cmd+1). Click the third button on the top row (a '4'). Now click the Quickstamp tab.

2. Selecting the attribute by search

Know the name of of your attribute? Start typing the name and the correct group and attribute name are selected for you in the two pop-up menus below.
Start typing in the top input box. As you do so, Tinderbox will offer auto-completed matches. Typing 'CaptionO' will match $CaptionOpacity as illustrated. As there is only one match, pressing the Return key will complete the selection and set the matched attribute in the Group and attribute pop-ups below it.
If the typed string has multiple completions, Border vs. BorderBevel, BorderWidth, etc., you will see a list of possible auto-completions. Use the arrow keys to select the desired item.

3. Selecting an attribute manually

First select the group, then the desired attribute. Here the choice is $CaptionOpacity in the Appearance Group

4. Setting a new attribute value - single note

For a single note and using no prototypes, this is how the tab looks. To set $CaptionOpactity to 80, select the current value and type 80 in its place. Then click the Apply button. The attribute is updated.
Important: the Apply button is used only when setting a local value. For managing inheritance, use the two arrow buttons above the value box, as described in the following steps.

5. Setting a new attribute value - multiple notes selected

The process is as described above, but note the tab now tells you that several note - two in this case - are selected.

6. Understanding the default buttons - a single, unmodified note

The title and value on the left are the inherited value (in this case the app default for $CaptionOpacity).
The title and value on the left are the local value. As the value hasn't been set, it is actually inherited which is why the label above is 'default value'.

7. Understanding the default buttons - a single note with locally set value

If the attribute has been set locally, even if to the same as the default/inherited value (a common configuration misstep) can you tell? Yes, see above. In this case the right-hand button caption is 'assigned to this note'.
To re-enable inheritance (so as to look like the last step above), click the left arrow button above the input box. The right-hand caption will change to 'default value'.pNote

8. Understanding the default buttons - a single note with a prototype inherited value - 1

In this case a note has a prototype 'pNote' that has a non-default value of 70 for $CaptionOpacity. Notice how the left button's caption is 'inherited', telling us it is an inherited non-app-default value. The right-hand caption indicates not only is the note's value not set locally (it's 'inherited') but also tells you the name of the prototype involved, which is useful when debugging inheritance issues.

9. Understanding the default buttons - a single note with a prototype inherited value - 2

Assume you mistakenly apply a local value of 85 to this note, the interface now tells you - via the right-hand label - that it is locally set. As in the previous example, to re-enable inheritance from the prototype, click the left arrow button. Done!

10. Understanding the default buttons - multiple selections with different inheritance (same prototype)

In this case, one note has a local value of 85 and the other inherits 70 from a prototype. As a result there is no common already-set value but their common inheritance is the prototype's value of 70.

11. Understanding the default buttons - multiple selections with different local values

In this case, no prototypes are involved but it does indicate at least one note has a local value set and that not all the selected notes have the same value. If they did, the common value will appear in the input box. As no prototype is involved, the default value shown u der the left button is the document default value of 100.

12. Summary
As can be seen Quickstamp is a nuanced control. Beside simply setting the odd local value, it can also be used to check and alter inheritance of attribute values.
Don't overlook other methods of altering attribute values:
- Key Attributes table on a text pane
- Get Info pop-over, attribute pane. This works just like Key Attributes, except that all attributes for a currently selected group are shown.
- Action code: rules, actions and stamps.