Used to using Create/Rename or the sidebar in v5 to set KeyAttributes (KA). Both those methods have gone in v6. Good news though, v6 has a much simpler method.
This document was last revised using Tinderbox v7.5.4 on macOS 10.13.6.
Author: Mark Anderson (a Tinderbox user since 2004).
1. The Key Attributes button

To start adding or editing Key Attributes, click the + button that the right side of the top area of the text pane (the right pane of the main window).

2. The Key Attributes pop-over

A pop-over appears, with the top box selected. This is where existing KA are listed and where you type to find/add new ones…

3. Key Attributes selector
3.1 Selector auto-complete 1

Start typing the attribute name you wish to add. Here, 'Capti' has been matched to several possible matches.
3.2 Selector auto-complete 2

Press the down-arrow key and the selected completion is added to what you typed. Click either the Return key or the Tab key to accept the choice

4. New KA added

See how CaptionFont has been added as a KA. At the same time, the lower left panel automatically selects the attribute group to which the new addition belongs. The right pane then shows the group's attributes with any current KA being ticked, as is seen for CaptionFont. This is useful as it map help find other associated attributes in the same group.

5. Key Attributes - adding KA via attribute listings
5.1 Adding KA via tick boxes

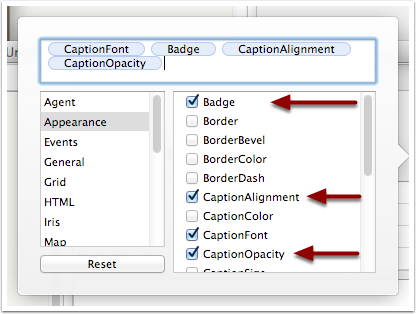
Notice how three extra KA have been added by simply ticking their entries in the lower right panel. Items are added to the top list in the order that are selected - this is the order using in the KA list when finished.
Note: User attributes are listed as the 'User' group, as the last item in the left side listing.
5.2 Using the attribute group list

Here, the lower left list has been used to select the 'Map' group and Height and Width have been manually added.

6. Key Attributes - re-ordering KA
6.1 Re-ordering KA in the popover - 1

To make Badge the first KA, click on it and drag it to the #1 position in the top box.
6.2 Re-ordering KA in the popover - 2

Drop the dragged item in the current position. Badge will now be the first KA.

7. Key Attributes - closing the popover

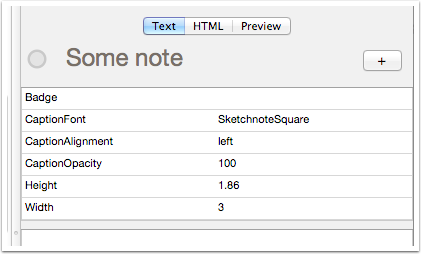
Click outside the pop-over to close it. You can now see the note's KA table, listed in the order as seen in the top of the pop-over.

8. Key Attributes - adding a new attribute
It is possible to add a new attribute from the KA pop-up.
8.1 Adding a new attribute 1

Type the desired new attribute name into the top box and press Return to save that value. Now click outside side the pop-up to close it. A new pop-up appears...
8.2 Adding a new attribute 2

This pop-up shown only if the defined KAs include values of non-existent attributes. By default, the suggested attributes are not created. Closing the pop-over that this point results in no new additions. In the example above the first suggestion is a mistake, to be discarded. THe second is an intended new attribute and so is ticked.
Note that the only customisation of the new attribute available at this stage is the set the data type: the default type is 'string'. To make any other customisation of the new attribute use the User tab of the Document Inspector.
8.3 New attribute added to document and KA

The KAs now include the newly-added attribute.

9. Key Attributes - drag-reordering the KA table

You can also re-order the table by drag-dropping the KA item titles (left side of the table). Here, CaptionFont has been dragged from second to fourth position.

10. Key Attributes - drag-reordering the KA table
Existing KAs can be re-ordered via the KA pop-over.
10.1 Re-editing KA table via the pop-over - 1

Click the + button. Note all the KA are selected. Click in the top panel to de-selected them before editing. The default select all makes it very easy to delete all KA quickly - if that's what you want.
10.2 Re-editing KA table via the pop-over - 2

The KA now show as individual items.

11. Key Attributes - deleting a KA via the pop-over
Existing KAs can be deleted from KAs (but not the document itself) via the KA pop-over.
11.1 Deleting a KA via the pop-over - 1

To remove CaptionFont as a KA, click it it select it.
11.2 Key Attributes - deleting a KA via the pop-over - 2

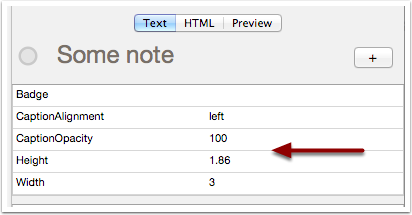
Click the Backspace key to delete the selected item. That item is now removed form the KA table. Alternatively, you can use the lower two panels to select a group and un-tick current KA items for that group.
11.3 Key Attributes - deleting a KA via the pop-over - 3

Click outside the pop-over to close it. Notice the KA table has now been updated.

12. Key Attributes - deleting a KA from the KA table
A KA can be deleted without opening the pop-over...
12.1 Key Attributes - deleting a KA from the KA table - 1

To delete a KA without opening the pop-over, simply click on the caption for the item to be deleted - here it is CaptionAlignment - so that it is highlighted
12.2 Key Attributes - deleting a KA from the KA table - 2

Now click the Backspace key and the KA is deleted.

13. Key Attributes - scrollbars with over 15 KA

If over 15 KA are selected (here there are 16) , the KA displays a scrollbar and can be scrolled to reveal 'hidden' KA. The KA table operates in all other respects as usual.

14. Key Attributes - work with prototypes
Don't forget that KA are something that can be inherited via prototypes - this saves setting each note up by hand when lots of notes may need the same KA.

15. Key Attributes - stored as $KeyAttributes
Under the hood, a notes KA are stored as (or inherited as) $KeyAttributes, a Set-type attribute in the TextFormat group of System Attributes. LIke any attribute it can be scripted via action code: rules, agents, OnAdd and by stamps.

16. Key Attributes - altering via action code
As the KA table contents and order is stored in $KeyAttributes, it is therefore possible to to set/add/remove/re-order KAs via action code. for instance to set a new note to show $Height and $Width as KAs:
$KeyAttributes = "Height;Width";Note that when setting/altering KAs via this method you use the KA attribute name only, without a $-prefix. The order of the list you supply is the order in which the KAs are listed in the KA table.